Walkthrough: a five-bedroom house, start to finish
Follow one fictional house, Maple House, from an empty workspace to a steady monthly routine. Each step names the buttons to use, what you should see afterwards, and the guide with more detail.
On this page
The route at a glance
- Add the propertyProperties › Add propertyMaple House in Properties, rented By room
- Add roomsProperty › Board › Add › RoomFive bedrooms with asking rent, plus shared spaces
- Floor plan (optional)Property › Floor planRooms drawn in place and shaded by status
- Add peopleBoard › Add › PersonFour people, each with No current agreement
- Record agreementsRoom details › Set up a rental agreementRooms 01, 02, and 04 Occupied; Room 02 split $550 and $550
- Assign parkingBoard › Add › ParkingP01 assigned to Alex at $75 a month
- Track rentRent › LedgerRent tracked for each agreement, and Priya’s cash recorded
- Log a repairRoom details › RecordsA High-priority task linked to Room 02
- Move-in conditionProperty card › Condition › New recordA completed Before move-in record for Room 04
- Monthly routineProperty Overview, Rent pageLate rent reminded, deposits confirmed, dates checked
- Turn over Room 01Overview, Condition, the agreementAlex’s agreement ended, a new agreement from December 3
- AI assistant (optional)Settings › AI assistantsAn assistant that answers questions about the house
Maple House is the fictional five-bedroom house used across Roomline’s guides and blog. The bedrooms are priced to a $4,000 monthly target: Room 01 at $790, Room 02 (the suite with a private bath) at $1,025, Room 03 at $765, Room 04 at $730, and Room 05 at $690. Alex Morgan rents Room 01, Jamie Chen and Sam Rivera share Room 02, and Priya Shah rents Room 04. Use your own details; every name and figure here is made up.
You don’t need to finish in one sitting. Steps 3 and 12 are optional, and nothing later depends on a floor plan or a bank connection.
1. Add the property
Create Maple House
From the workspace navigation, choose Properties, then Add property.
Enter the Property address. Under Alias (optional), enter Maple House so the house is easy to recognize.
Set Property type to House and Rental setup to By room, the setup for renting individual rooms separately. Choose Add property at the bottom of the form.
Open Maple House from Properties, and choose Board in the left rail if it isn’t already selected.
2. Add bedrooms and shared spaces
Asking rent is a planning figure. The rent a resident actually pays goes on their agreement in step 5. Bedrooms count toward your plan’s spaces; kitchens, bathrooms, living rooms, and shared areas don’t.
Add each room, then name it
On the Board, choose Add, then Room. Roomline creates a room named Room 1 right away; no form opens first. Each choice creates another room, so choose it once per room.
Select the new card. On the Details tab, set Room name to Room 01 and Room type to Bedroom. Enter 790 in Asking rent / mo and 1 in Planned occupants, then choose Save details.
Repeat for Rooms 02 to 05 with their asking rents. Give Room 02 a Planned occupants of 2, because a couple may share it.
Add the shared spaces the same way: Living & dining as Living, Kitchen as Kitchen, Bathroom as Bathroom, and Hallway as Shared. Asking rent and Planned occupants disappear for these types, because they are never rented on their own.
3. Draw a floor plan (optional)
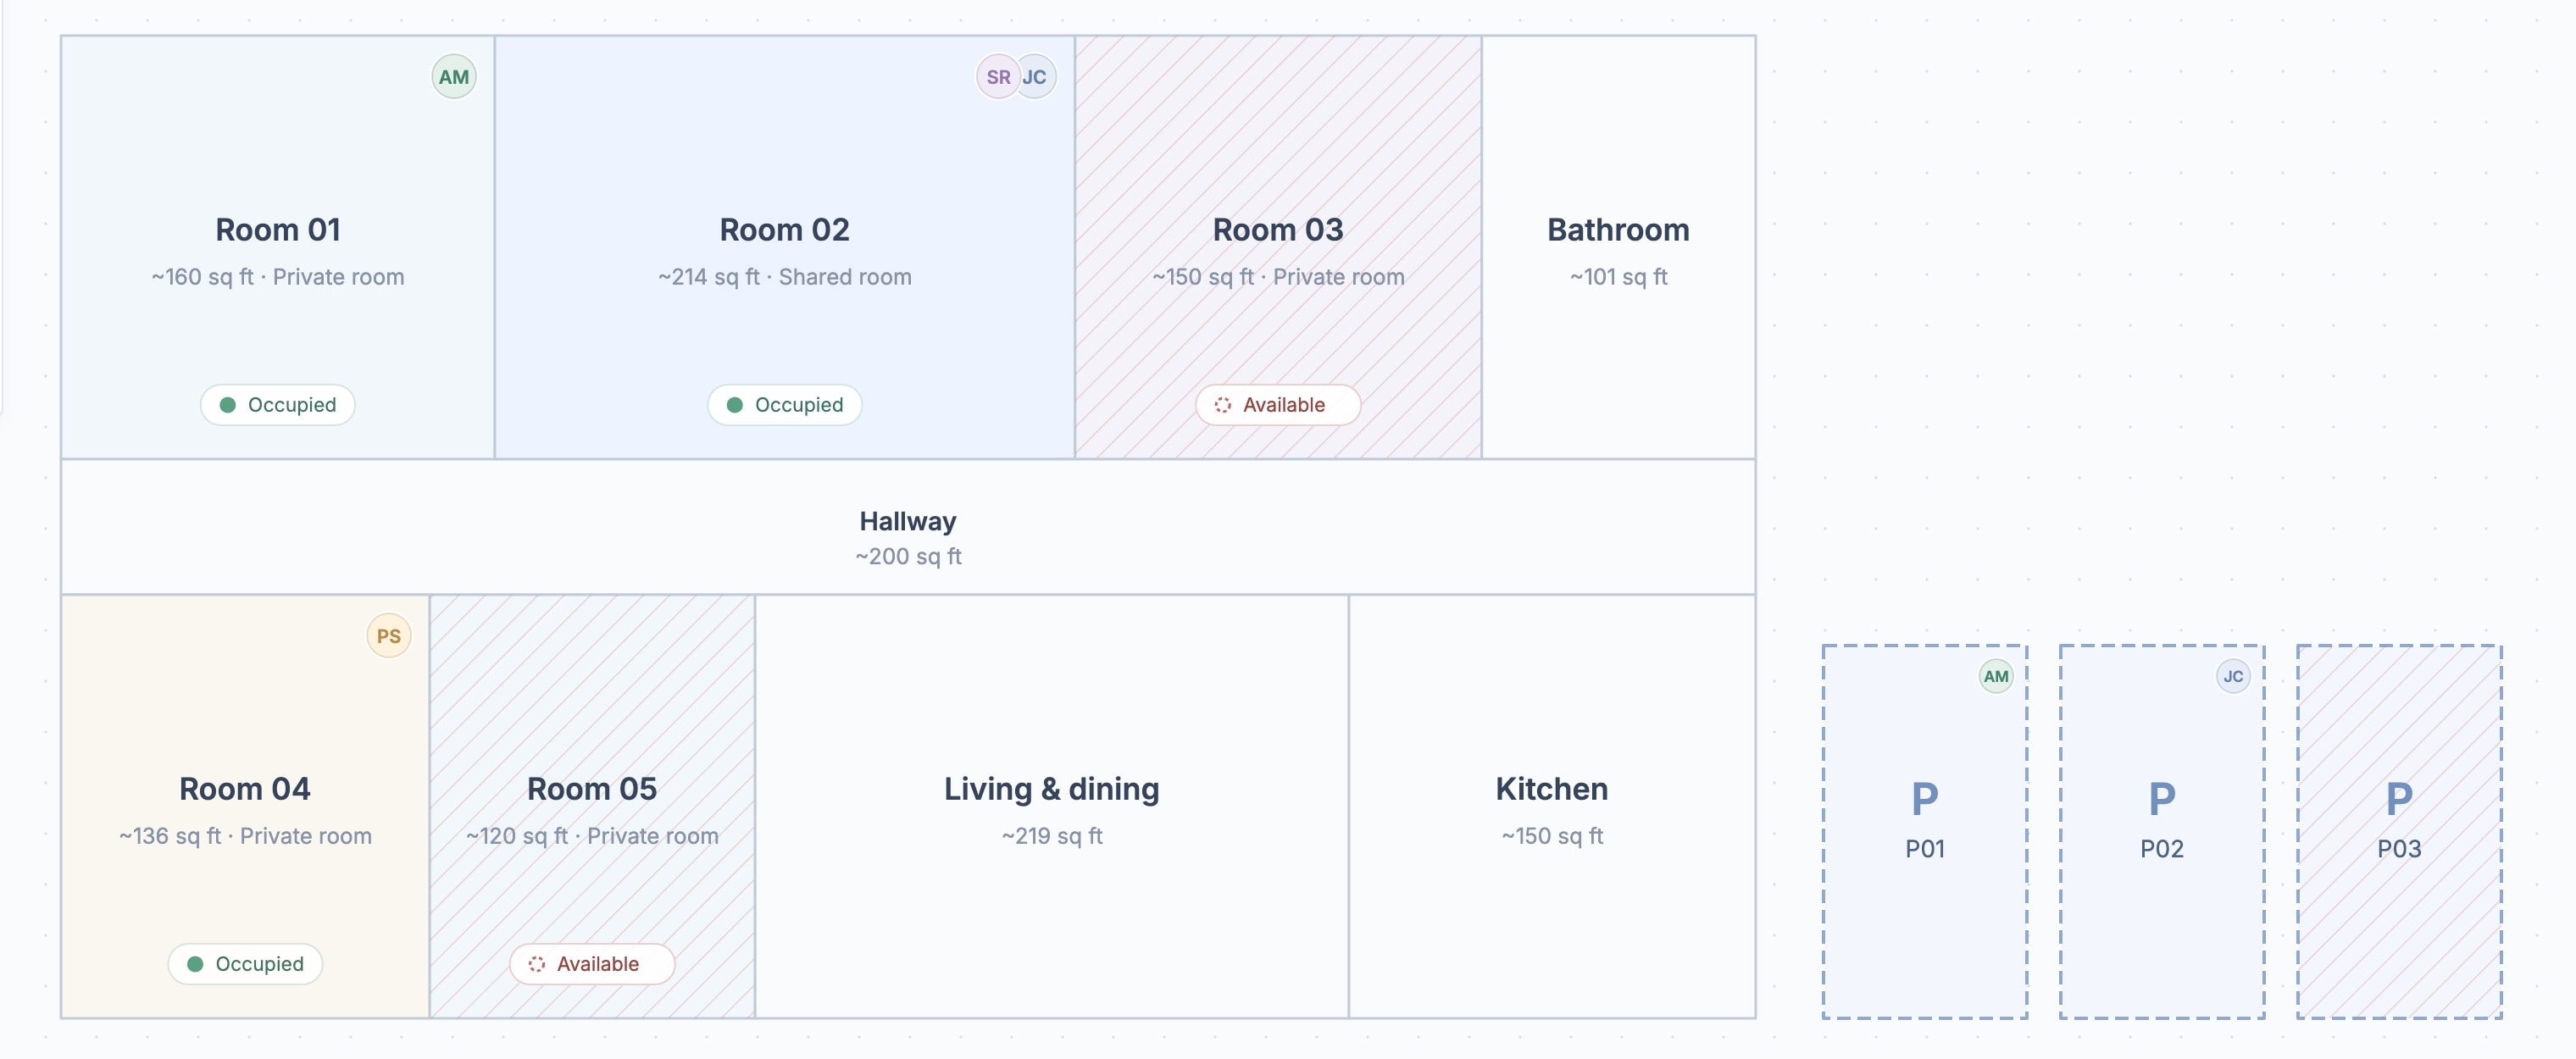
Place the rooms you already added
Choose Floor plan in the left rail. Every property starts with a Ground floor; choose the plus beside the floor name to add another.
Choose Upload floor plan to trace over a PNG, JPG, WebP, or PDF of the layout, or draw on the blank grid.
Your rooms are listed under Place on plan beside the canvas. Choose Place next to Room 01, then draw it with Rectangular room (R) or Room outline (P). Drawing places the existing room; it doesn’t create a second one.
To show floor area, choose Calibrate scale (C), drag along a wall you have measured, enter Line length (feet), and choose Apply scale.
4. Add the people
Add Alex, Jamie, Sam, and Priya
On the Board, choose Add, then Person. Roomline creates New person 1 with the status Draft person. You can also open the property’s Tenants tab and choose Add tenant.
Select the card and enter the Full name, plus Email, Phone, Preferred contact method, and Notes if you have them. Choose Save changes, or Add tenant in the Tenants form.
Repeat for Jamie Chen, Sam Rivera, and Priya Shah. If someone is already in your workspace, typing their name shows them under Already on file; choose Bring back instead of creating a duplicate.
5. Record the agreements
Record Alex’s agreement, then the shared one
Select the Room 01 card and choose Set up a rental agreement in its Details. Room 01 is filled in for you.
Step 1, Residents & space: under Residents, choose Alex Morgan. Under What are they renting?, keep Specific rooms with Room 01 under Rooms covered. Choose Continue.
Step 2, Agreement details: choose the Agreement type and enter the Start date and End date. Alex’s agreement ends November 30. Enter 790 in Monthly rent ($) and 790 in Security deposit ($), and set Agreement status to Active.
Optionally attach the signed copy with File or Link. Open Additional details, set Rent due day to 1 and Notice reminder (days before end) to 30, then choose Create agreement.
Start again from Room 02 and choose both Jamie Chen and Sam Rivera under Residents. Enter 1,100 in Monthly rent ($): the $1,025 asking rent plus $75 for a second occupant. Because there are two residents, Monthly shares appears. Choose Split equally, and the line reads $1,100 of $1,100 assigned.
Record Priya’s agreement for Room 04 the same way, at $730 a month with a $730 deposit.
6. Assign parking
Add P01 and give it to Alex
On the Board, choose Add, then Parking. Roomline creates Parking 1. Select the card to edit it. If Parking isn’t in the Add menu, switch it on under Tools in Settings.
Enter P01 as the Space label, choose Driveway under Space type, choose Alex Morgan under Assigned resident, and enter 75 in Monthly parking fee ($). Choose Save changes.
Instead of choosing a resident, you can drag a line between the parking card and Alex’s card.
7. Track rent, with or without a bank
Alex, Jamie, and Sam pay by bank transfer. Priya pays in cash. Roomline never moves money or charges anyone: it counts the payments you record and, if you link a bank, the deposits you confirm.
Start tracking and record a cash payment
Grace period: in Settings, under Rent defaults, check the Grace period. At 5 days, rent due on the 1st turns Late after the 6th.
Start tracking: from the workspace navigation, choose Rent. The Ledger lists the three agreements. Choose Track rent on each row, and each month from now on expects its rent.
Record the cash: on Priya’s row, choose Record payment. Keep Full $730, check Paid on, choose Cash under How it arrived, add a Note such as a receipt number, and choose Record payment.
Receipt: select the month again and choose Copy receipt, then paste it into a text to Priya.
With a bank (optional): choose the Bank matching tab, then Connect a bank, and pick the account where rent arrives. As transfers arrive, choose Rent under To review to confirm each suggestion, Change to move it, or Not rent for anything else.
8. Log a repair on a room
Record the leaking shower in Room 02
Select the Room 02 card and choose the Records tab. Choose No open tasks (it reads Log a task once the room has one). The Log a repair form opens with Room 02 under Room or area.
Under What needs attention?, enter Shower is leaking. Set Priority to High and leave Status on To do. Add a Due date, the Contractor and Phone, and Jamie Chen under Reported by, then choose Log repair.
When the plumber starts, select the task card and choose Start work. When it’s fixed, add an after photo, enter the Cost, choose Save changes, then Mark done.
9. Record move-in condition
Walk Room 04 before Priya moves in
Select the property card on the Board, choose the Condition tab, then New record.
Enter a Record title, set Record type to Before move-in, and choose Priya’s agreement under Agreement. Room 04 and the shared spaces are ticked under Areas to document; the other bedrooms are not. Set the Record date and Inspector / manager, then choose Create record.
For each area, choose Good condition, Existing wear, or Needs attention, and add dated photos.
When every area is reviewed, choose Complete record, then Complete & lock record.
10. The monthly routine
Once the house is set up, a month takes a few minutes. Work through this list a few days after the rent due day.
What to check, and where
Needs attention on the property’s Overview, most urgent first: late rent with Remind and Record payment, overdue and open repairs, agreements ending soon with Renew, and empty rooms.
Rent ledger: late rows are at the top. Choose Remind to copy, email, or text a message with the amount owed, or Record payment if the money came in cash, a check, Zelle, or Venmo.
Bank matching (if you linked a bank): confirm each deposit under To review with Rent, or choose Not rent. If a bank asks you to Sign in again, do it; until then months can look unpaid when they are only unmatched.
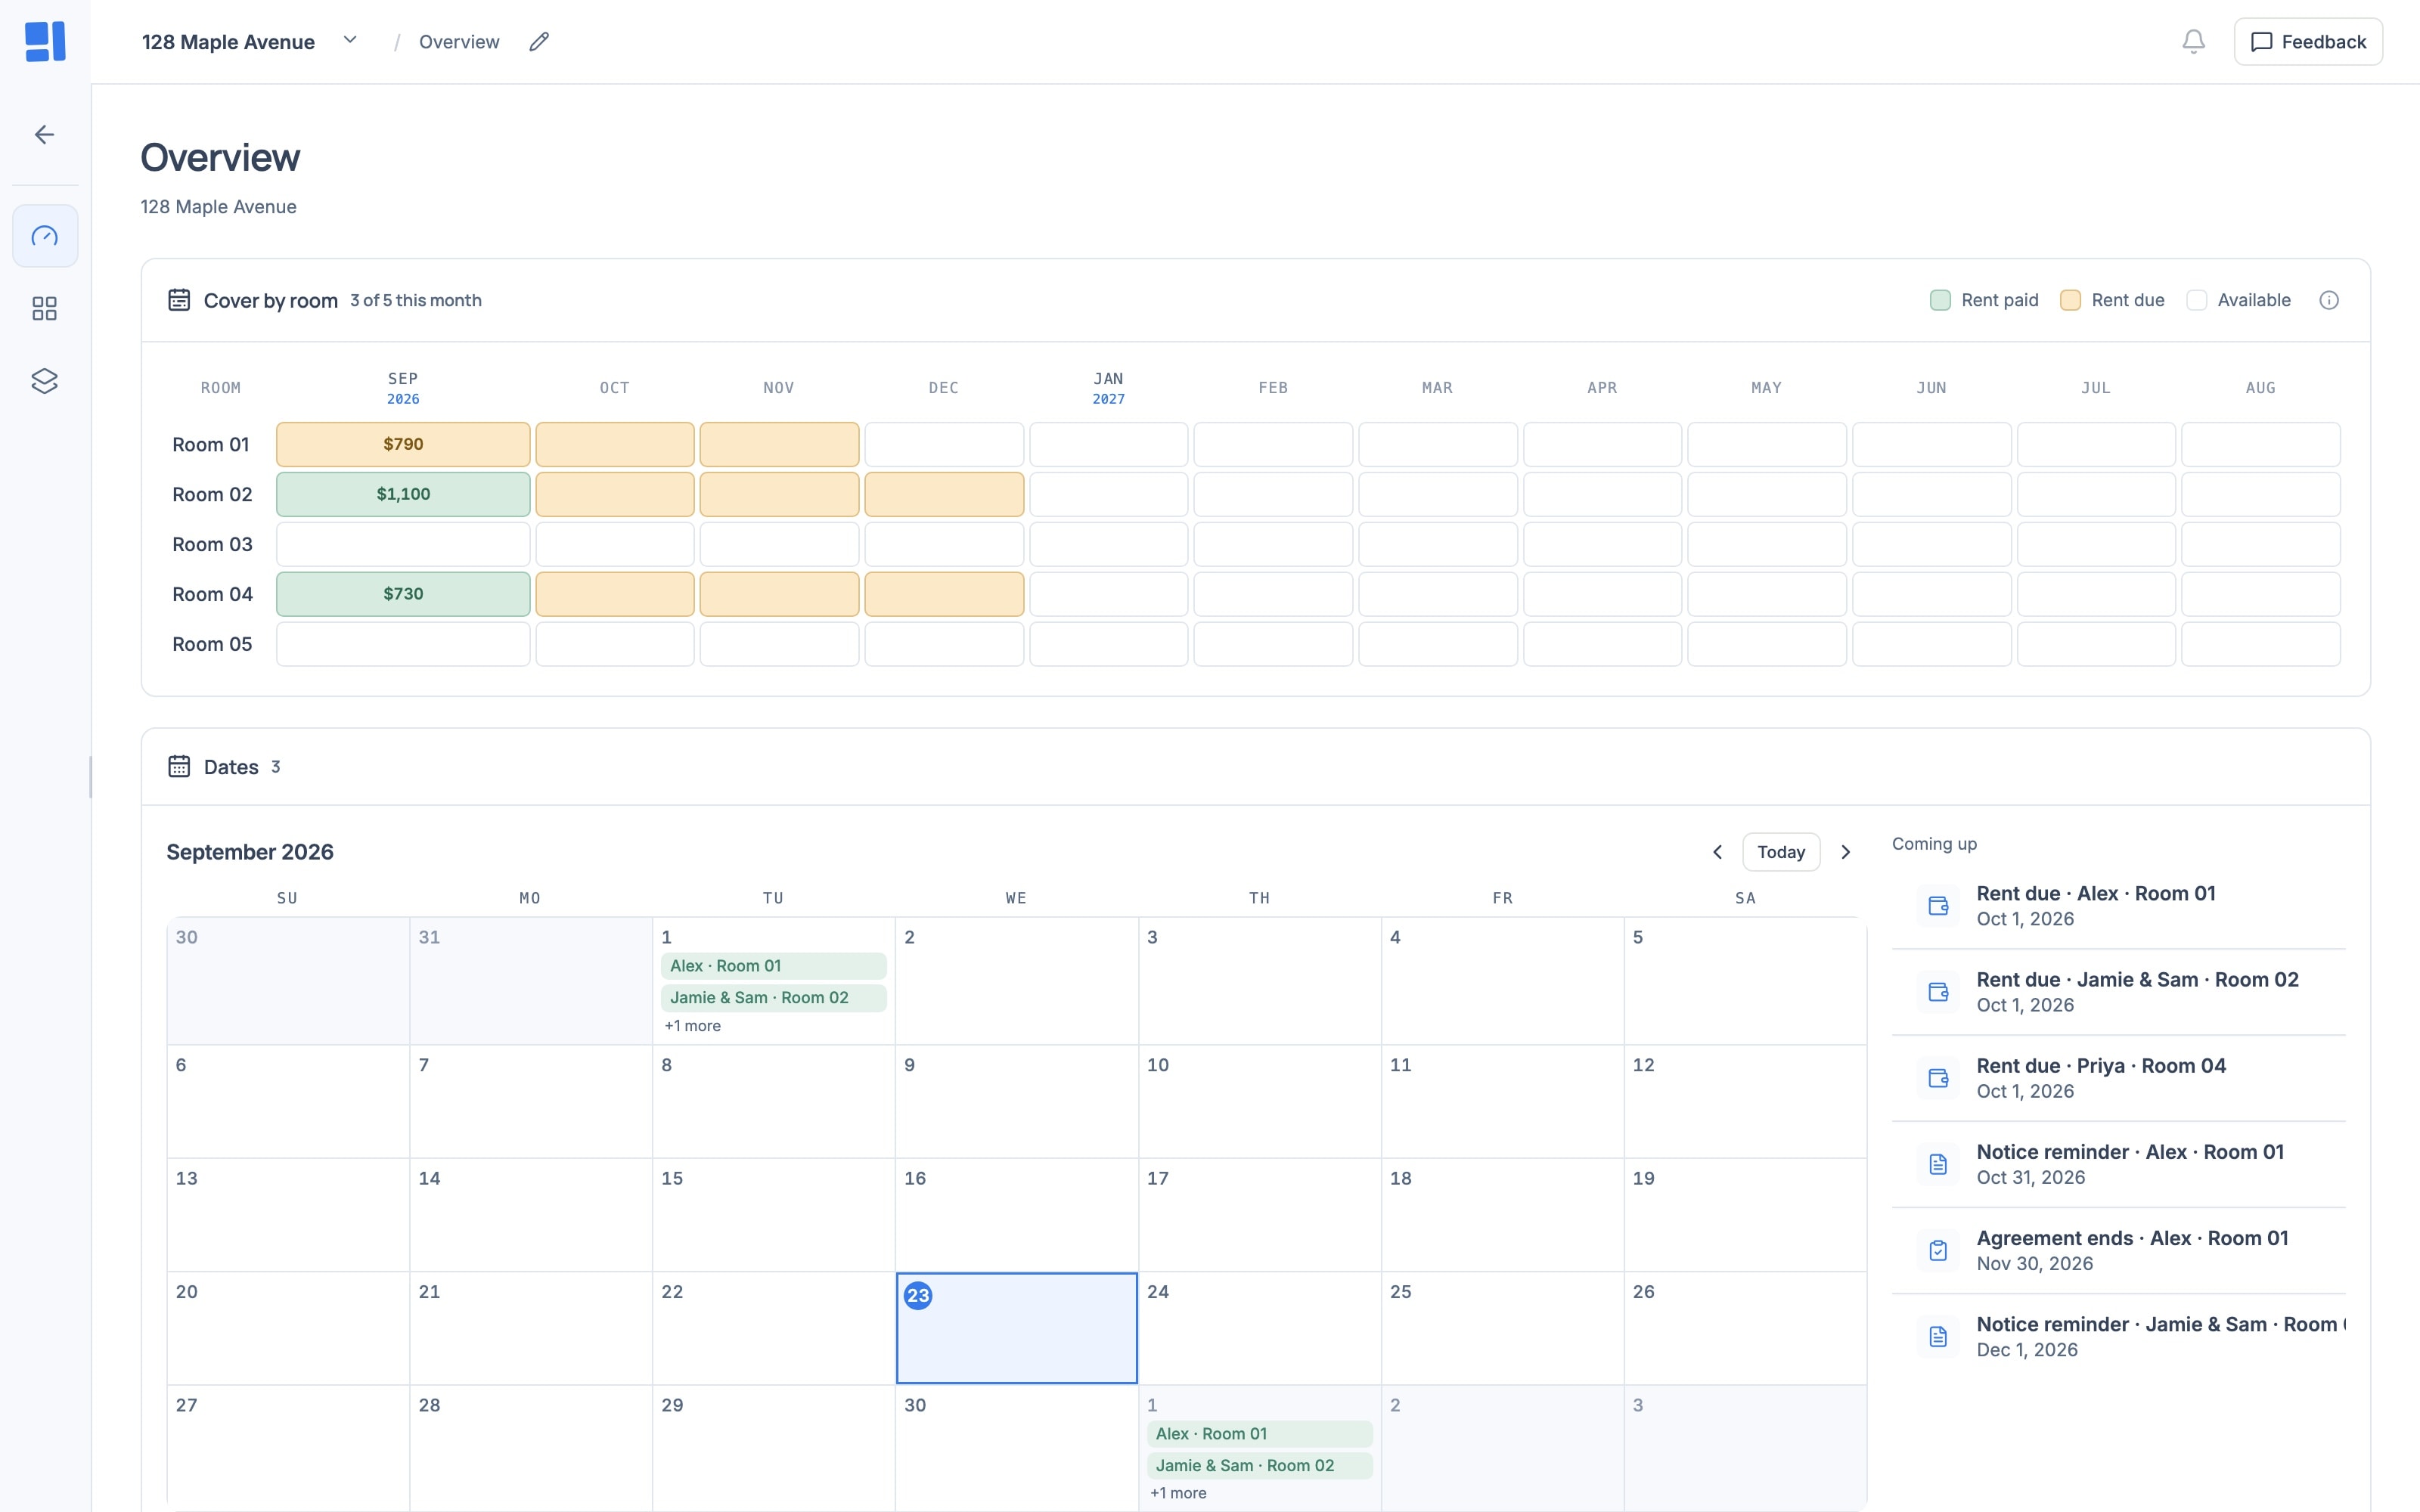
Rooms and Upcoming on the Overview: each bedroom’s months as tiles — paid, late, upcoming or empty — and when its agreement ends, then rent days, bill due days, agreement ends, and notice dates. Add to calendar downloads the dates for your own calendar app.
Utilities: enter this month’s bills and choose Copy split to send each tenant their share.
11. Turn over one room
Alex’s Room 01 agreement ends November 30 with a 30-day notice reminder, so the reminder falls on October 31. Alex is leaving, and a new resident, Taylor Brooks, moves in on December 3.
Don’t edit Alex’s agreement to swap in Taylor. That rewrites the past. End the old agreement and record a new one, so each keeps its own rent, deposit, and condition records. Roomline won’t save two active agreements that cover the same room on overlapping dates.
From notice to the next move-in
Notice: on the property’s Overview, Upcoming shows the notice date for Alex · Room 01 on October 31, and Needs attention lists the agreement as ending soon. It is a planning reminder only. Roomline doesn’t send or serve notice, so confirm with Alex yourself.
Move-out record: after Alex moves out, open the property card’s Condition tab, choose New record, set Record type to Move-out, and choose Alex’s agreement. Rate each area, add photos, and complete the record. If you recorded Alex’s move-in too, choose Compare with move-in to see the two side by side.
End the agreement: open Alex’s agreement from the property’s Agreements tab. On November 30, choose End agreement, which closes it today. To end it on another date, choose Edit agreement, set the End date, and set Agreement status to Ended. An agreement left Active past its end date shows Expired; Roomline doesn’t end it for you.
Parking: select P01 and set Assigned resident to Unassigned · available, unless Taylor is taking the space.
Archive Alex: once the agreement has ended, select Alex’s card and choose Archive. Alex leaves the Board but stays in Tenants under the Archived filter, with every agreement and record.
New agreement: add Taylor Brooks as a person, check Room 01's asking rent, then choose Set up a rental agreement on Room 01 with a Start date of December 3. Choose Track rent on its ledger row as in step 7, and record a Before move-in condition record against it as in step 9.
12. Connect an AI assistant (optional)
An AI assistant can read your workspace without your password. It can’t delete records, move money, upload files, send messages, or sign documents.
Connect, ask, and revoke
Token: in Settings, go to AI assistants and choose New token. Enter a Token label such as Claude Desktop, keep Read only under Access, choose Create token, then Copy token. The token is shown only once. Tokens need a hosted Roomline account.
OAuth sign-in: for custom connectors in the Claude and ChatGPT apps, add the connector with your Roomline MCP address and no token, sign in, and choose Allow read-only access. Access through sign-in is always read-only.
Ask questions such as: Who is late on rent this month? Which rooms are empty? What’s coming up in the next 60 days?
Revoke: choose Revoke beside a token, or Disconnect beside an assistant under Connected by sign-in.